
Overview
This open source project is a full visual-inertial mapping and localization stack: stereo + IMU odometry online, fixed-lag optimization in the loop, AprilTag-based global corrections, and an offline pipeline to clean trajectories up and turn logged sessions into usable maps.
The system was implemented as a means to keep learning and immersing myself in all the things robotics. I made this in the after hours of my weekdays and through many weekends. It was hard to work on this bit by bit, sometimes only 30 minutes a day. It took longer than I anticipated. There’s just so much tooling one needs to develop around the main product, to debug, to visualize. I think this is to a point where it’s already worth sharing but there’s just so much to keep working on.
I’d recommend to check the linked Github repo to dive deeper. It contains multiple readmes that explain the most important parts of the system. I’ll try to keep this portfolio post somewhat technical, but talk also about the story, results and learnings.
The workflow
The system is intended to be used to capture a map first, then localize in it. The two main workflows (and operation modes) of this system are mapping and localization modes.
There are 3 main steps to using the system:
- Run in
mappingmode and record a session. - Clean up the session offline and build map files from it.
- Run in
localizationmode using the optimized tag map.
1. Online mapping mode
mapping mode is the first half of the system. The camera moves through an unmapped space, the online estimator tracks motion in real time, and a logger saves a session to disk.
In this mode, the system is performing:
- stereo tracking (temporal tracking + L/R gating)
- IMU preintegration
- local window optimization
- keyframe logging
- optional AprilTag detections for later loop closure
The estimate is locally good, but it still drifts. The objective of this mode is to get through the space, keep a usable estimate online, and save enough information to clean the run up later.
2. Cleaning the run up offline
Once the run is done, it’s time to clean up. The online estimate is a good starting point, but depending on the environment and capturing conditions, it might be way off. This means not only the estimates have to be logged, but also the raw data to improve them with “unlimited” compute and time.
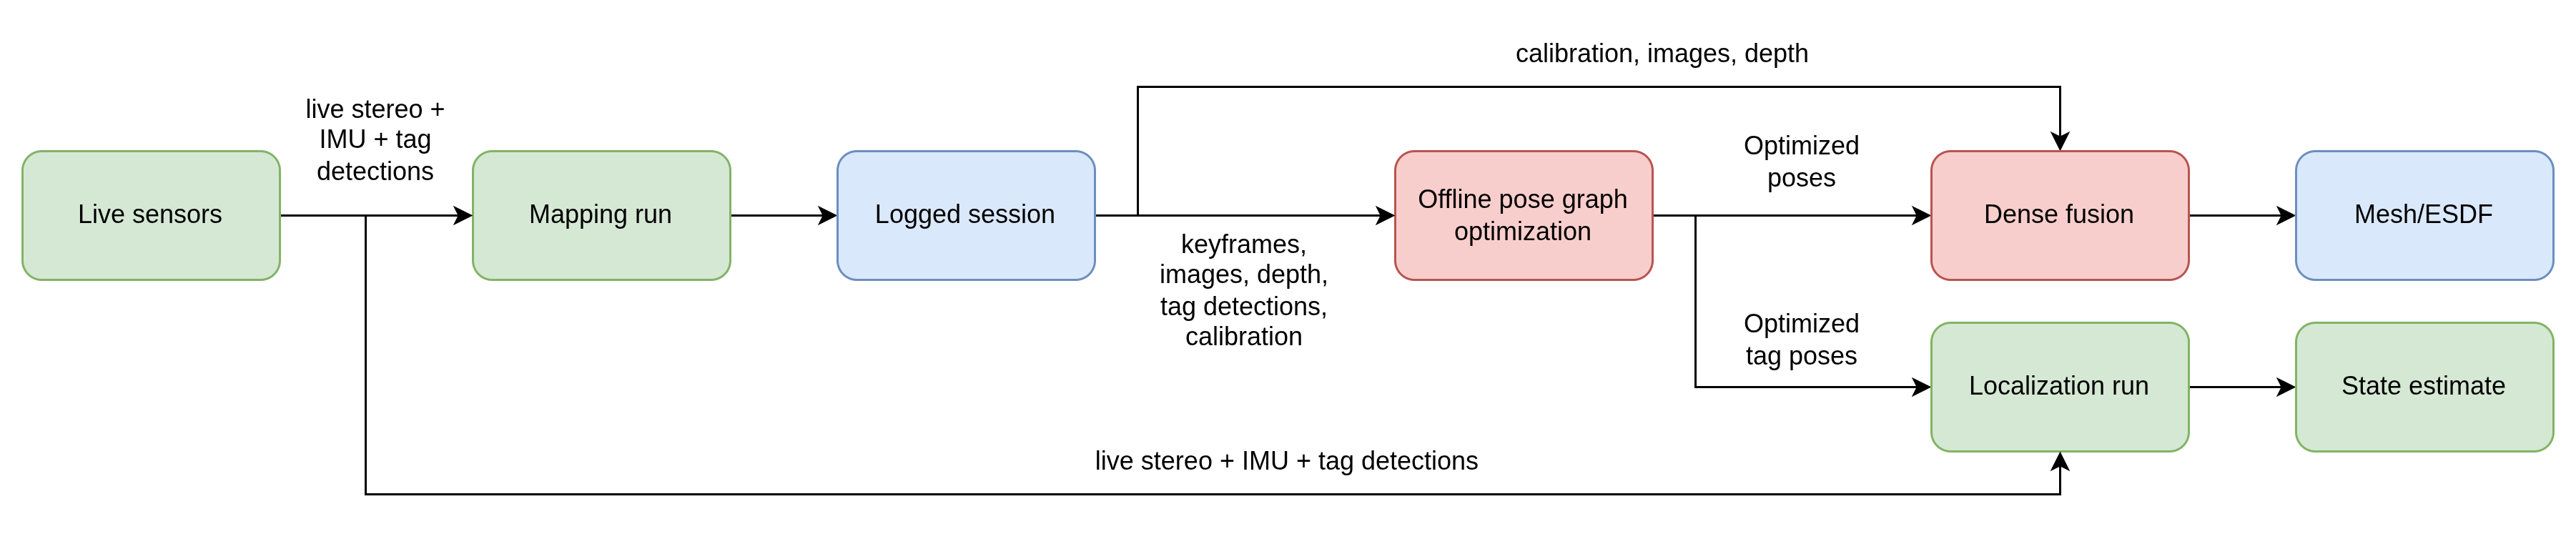
The first step is offline global optimization. This step rebuilds the run as a pose graph using the logged keyframes and tag observations. Right now, tags are doing most of the loop closure work here. The result is a cleaner set of poses and a cleaner tag map. Frontend health metrics are used as a covariance metric for edges between keyframes and that’s how the optimizer “knows” what nodes it can pull more to make corrections.
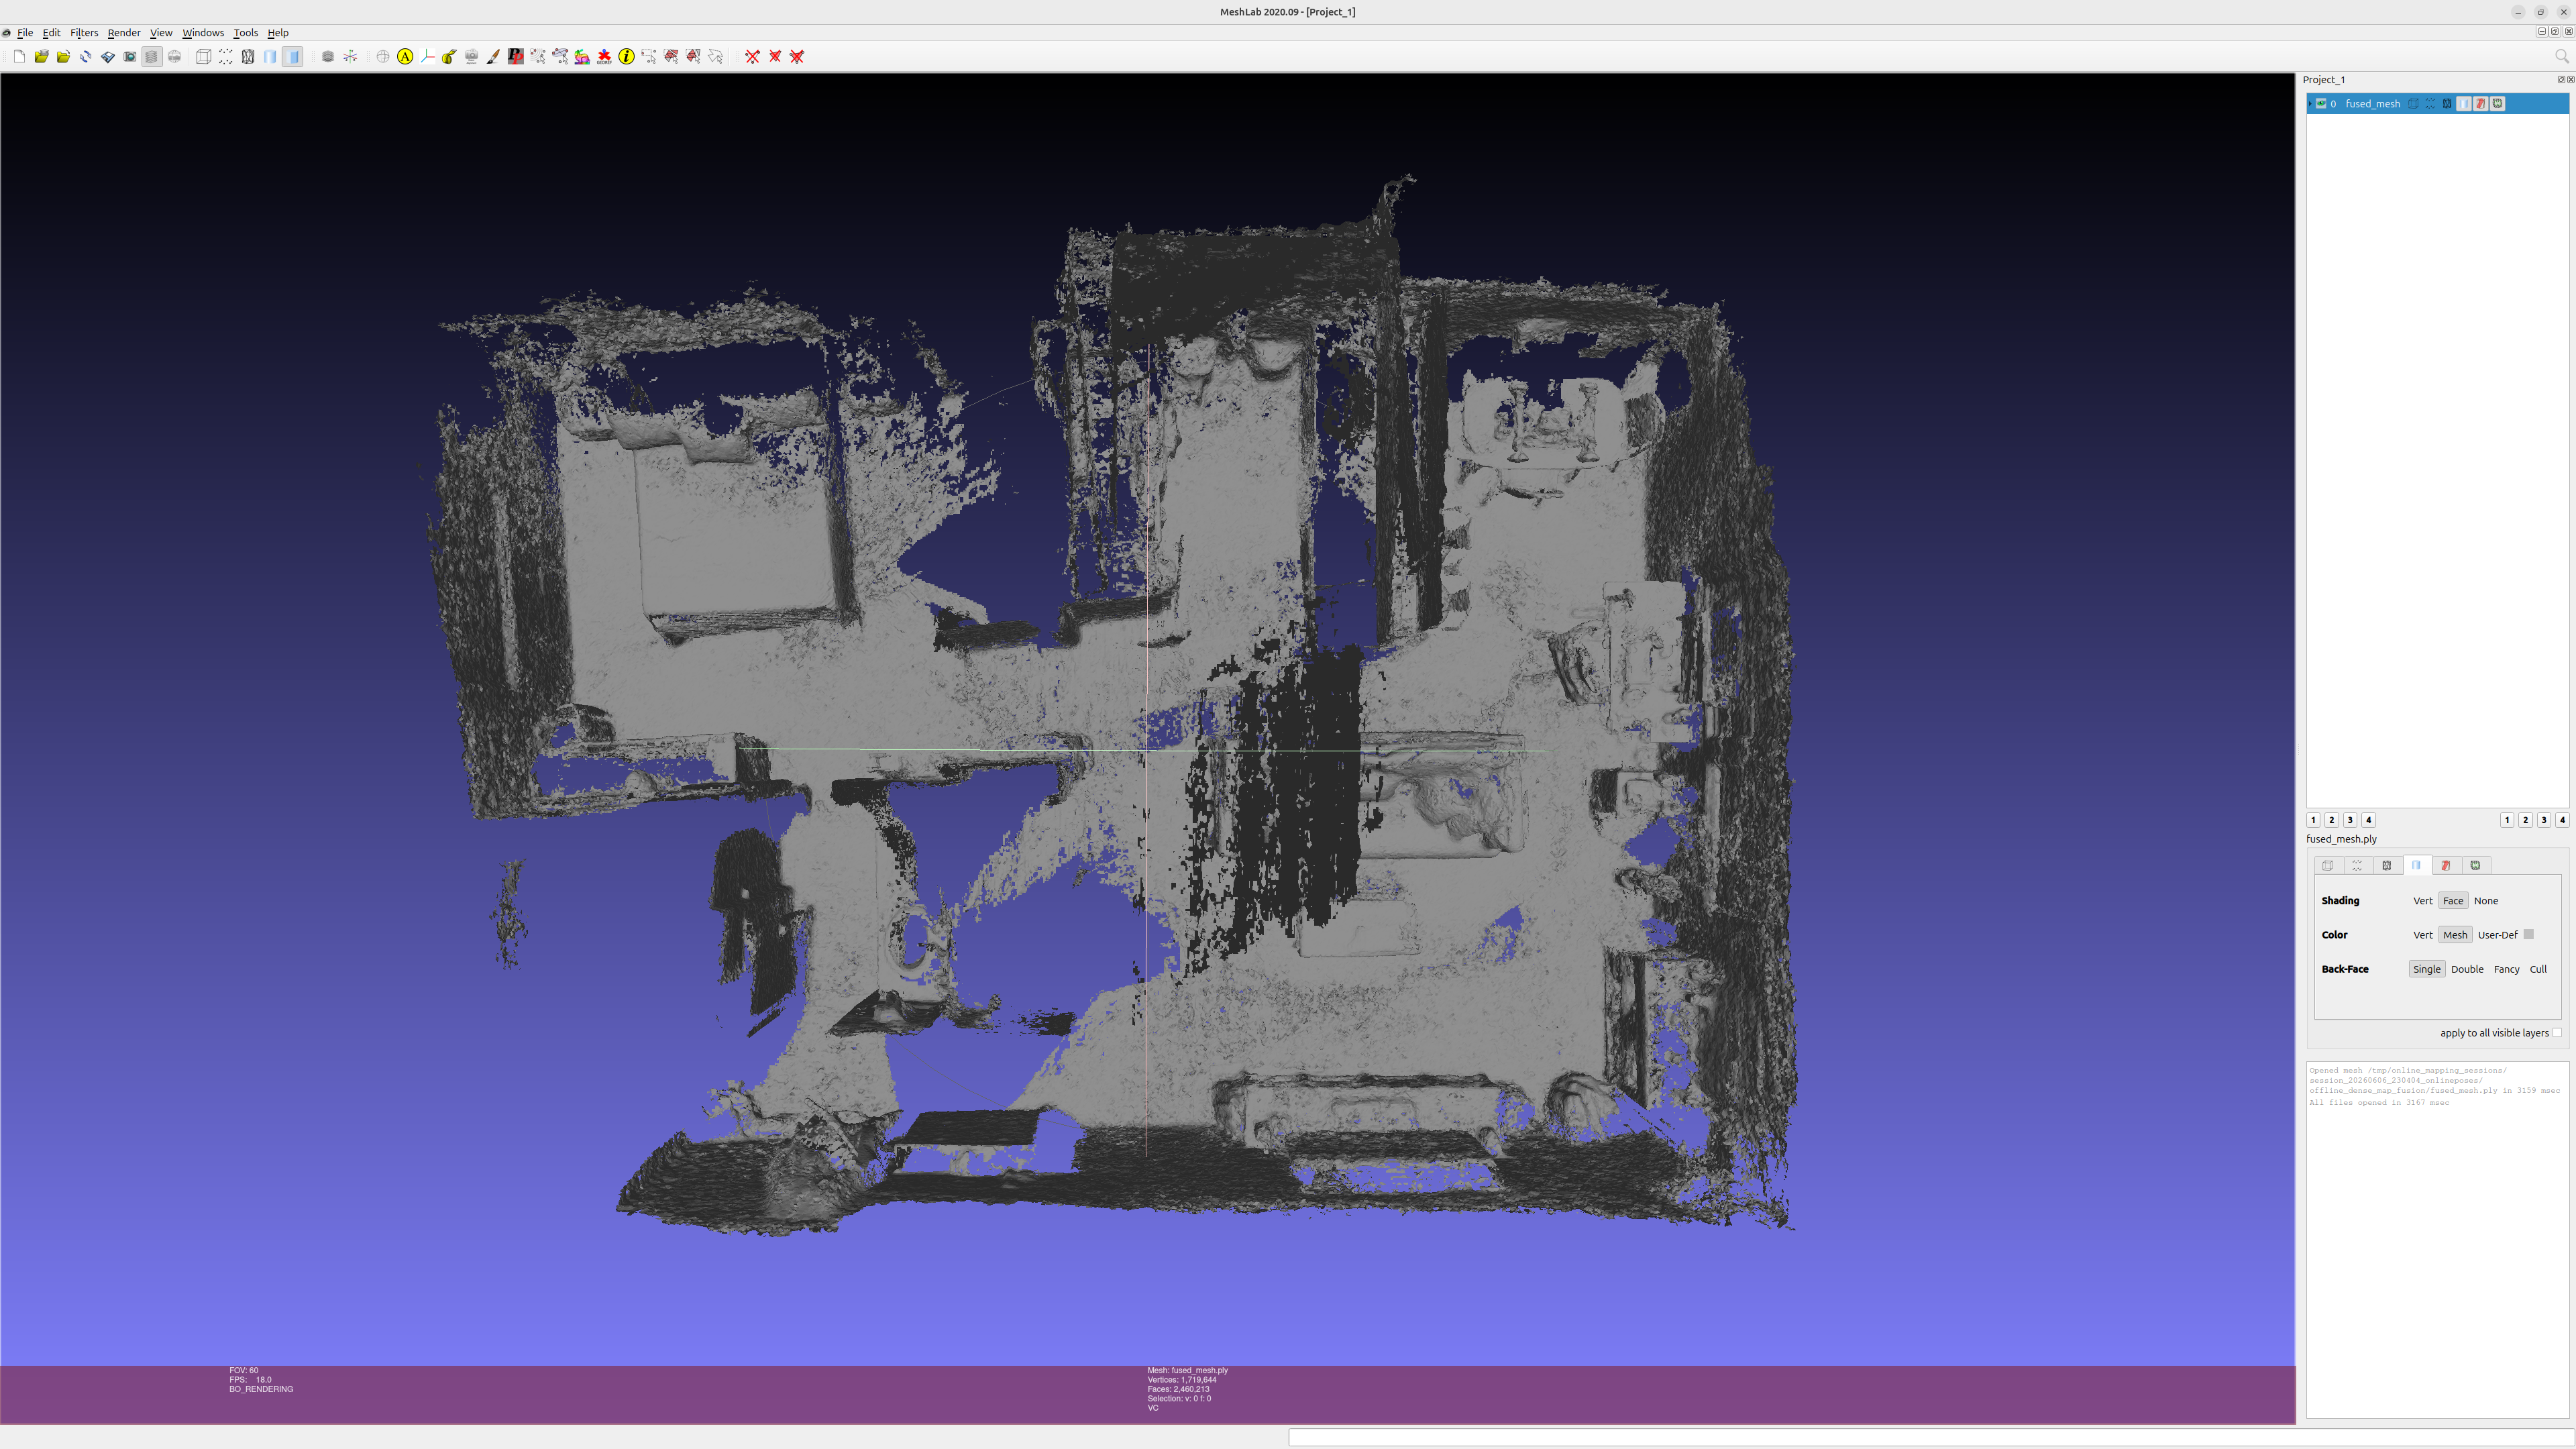
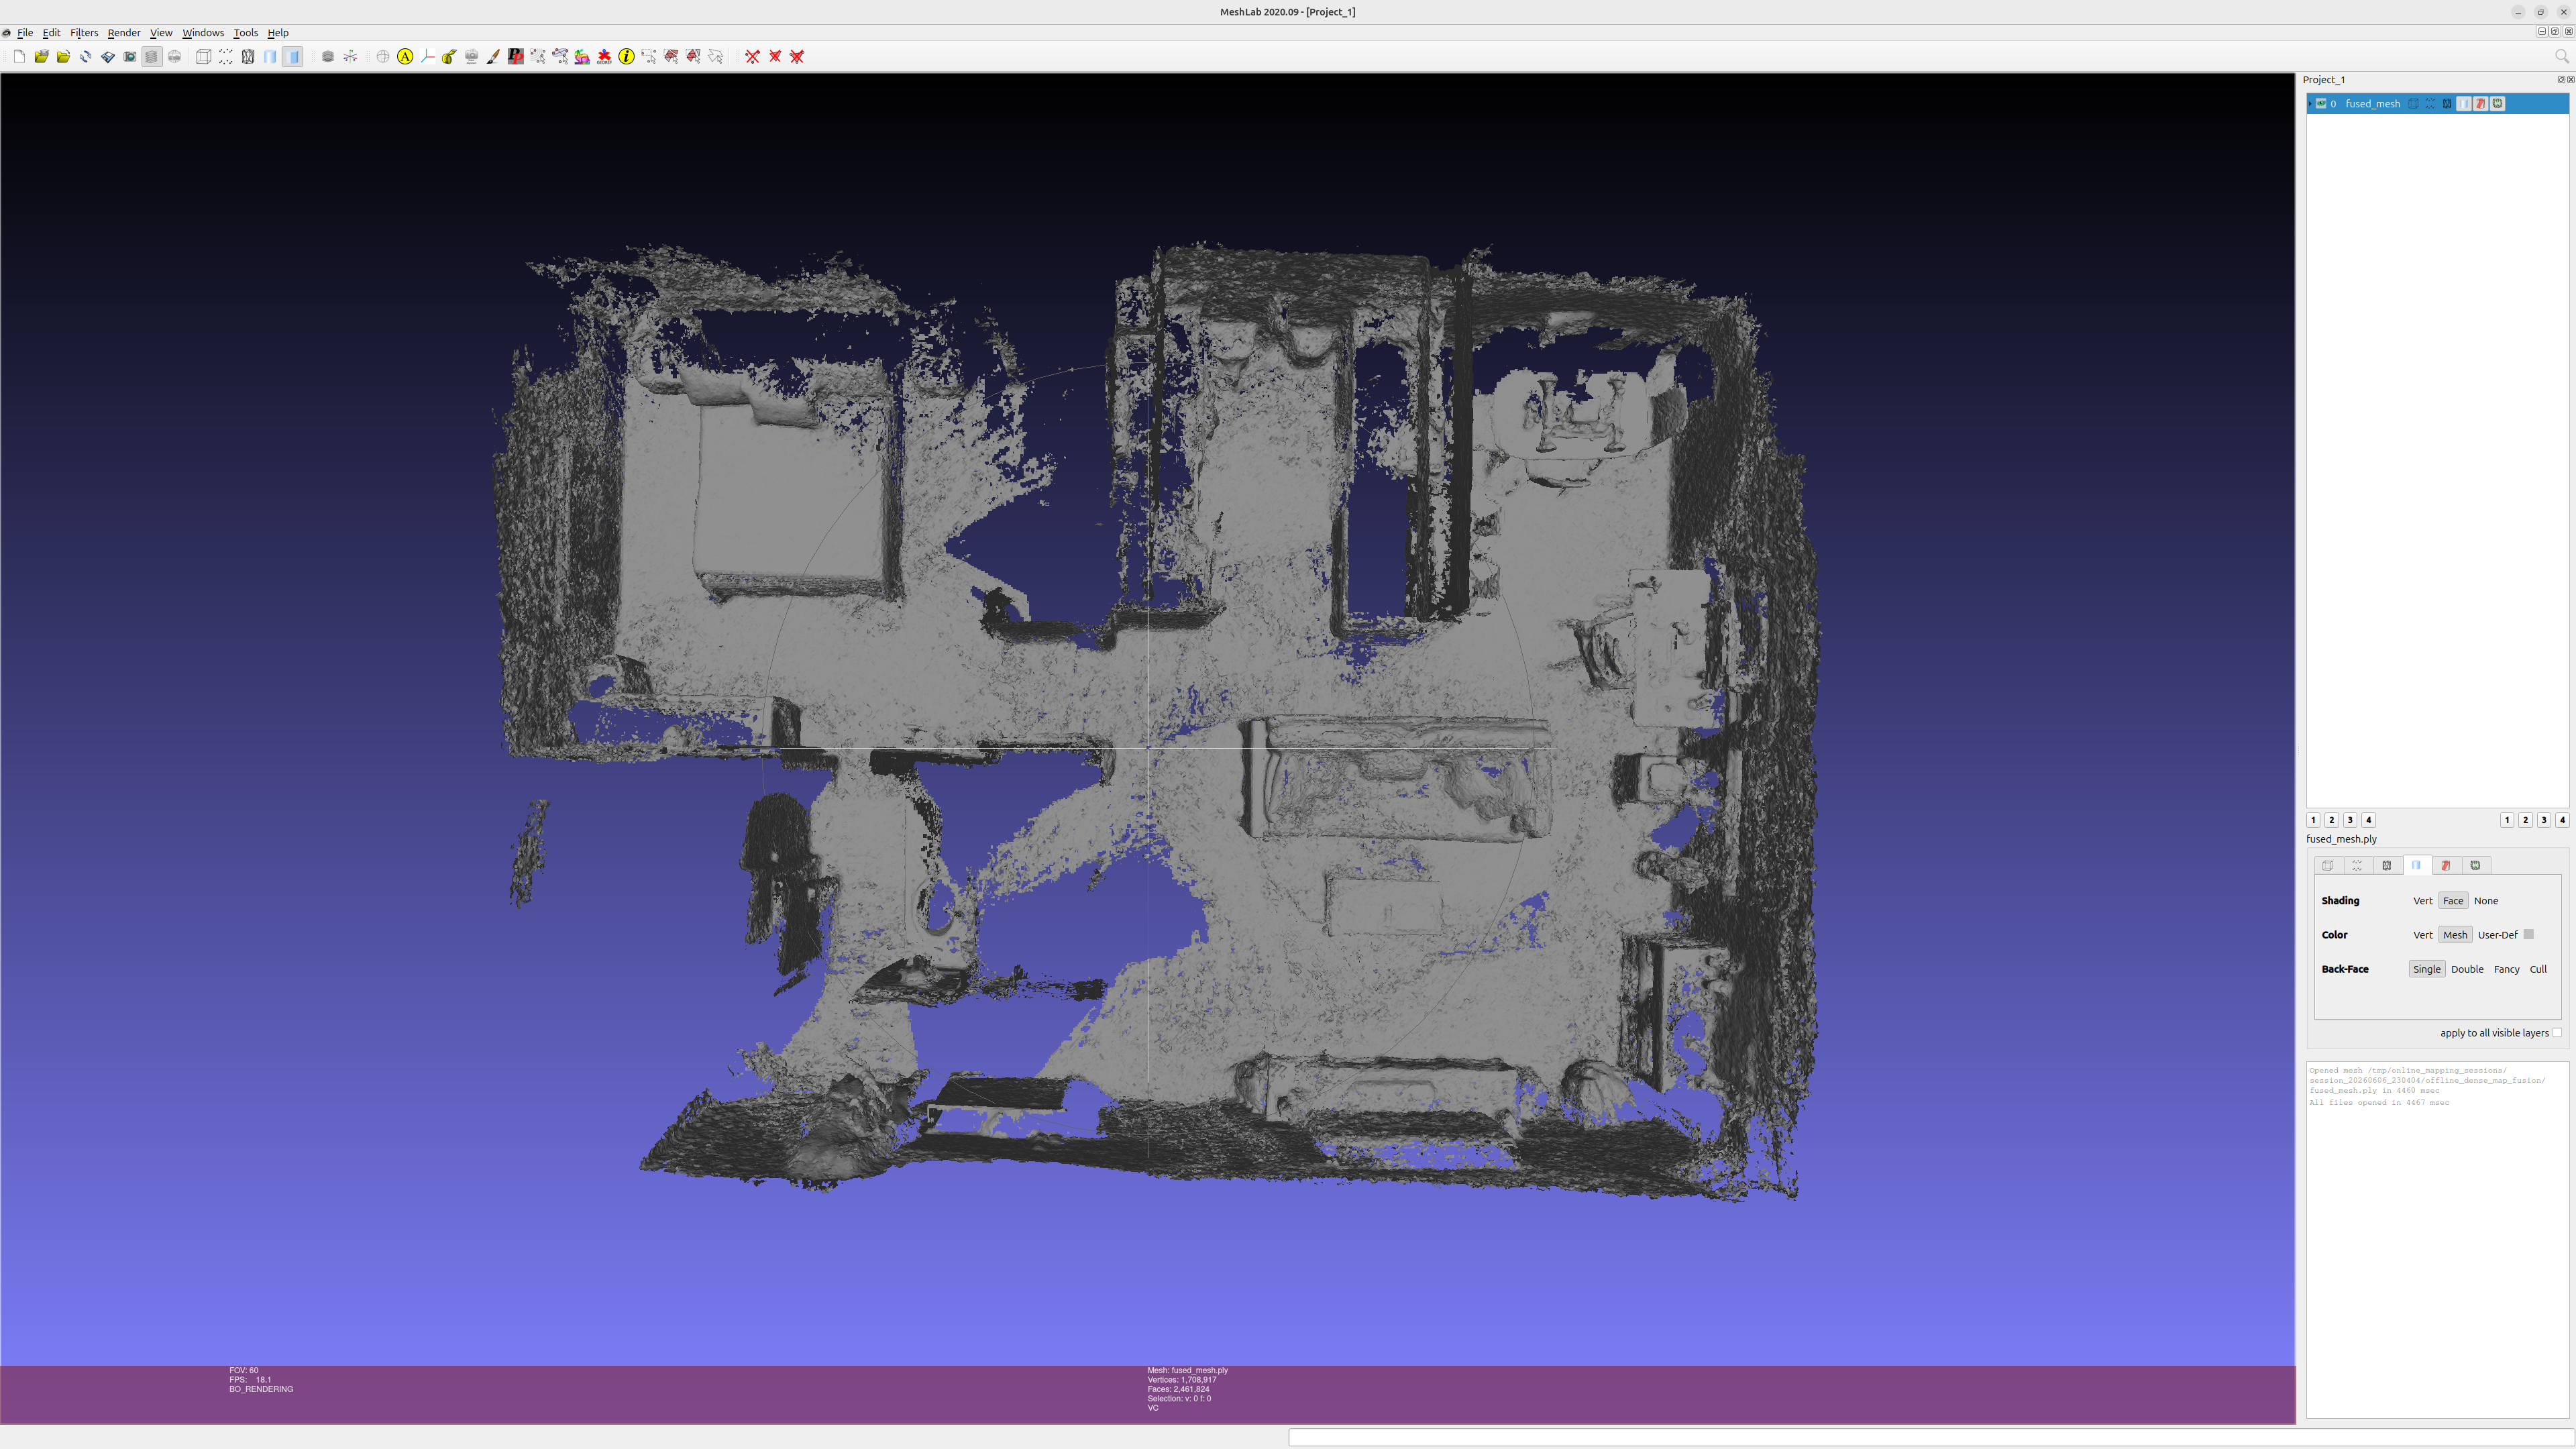
In Image 2 you can observe two meshes. One was generated from the raw logged poses and the other one was generated after optimization. For this run, the camera started and ended in the same place (I used a jig that stayed stationary while I walked around with the camera). Looking at the logged online data, the error between the first and last keyframe was 0.66 meters. After optimization, the error was brought down to 0.01 meters. This shows how important this extra step is. The massive help here is provided by using the tag detections to close the loop + the frontend tracking metrics used in the optimization.
Then those optimized poses get used for dense fusion. That is what turns the run into the denser map files: mesh, ESDF slices, and the rest of the exported artifacts.
3. Localization mode
After I have an optimized tag map, the system can switch to localization mode. In localization mode, the goal is no longer just to estimate motion relative to where the robot started. The goal is to stay consistent with a previously built map.
This mode runs the same odometry backbone, but now there is a localization node on top of it. That node loads the optimized tag poses and uses live detections to pull the estimate back toward the map frame.
The map in this system is really a set of optimized tag poses. That is an important limitation. I am not doing feature-map localization here. If the system goes too long without seeing a tag, it can still drift badly.
Under the hood
If you want to dive deeper, the linked repo has readmes for the main parts of the system. I’ll keep it lighter here and just go over the main pieces in the online stack.
Frontend and keyframes
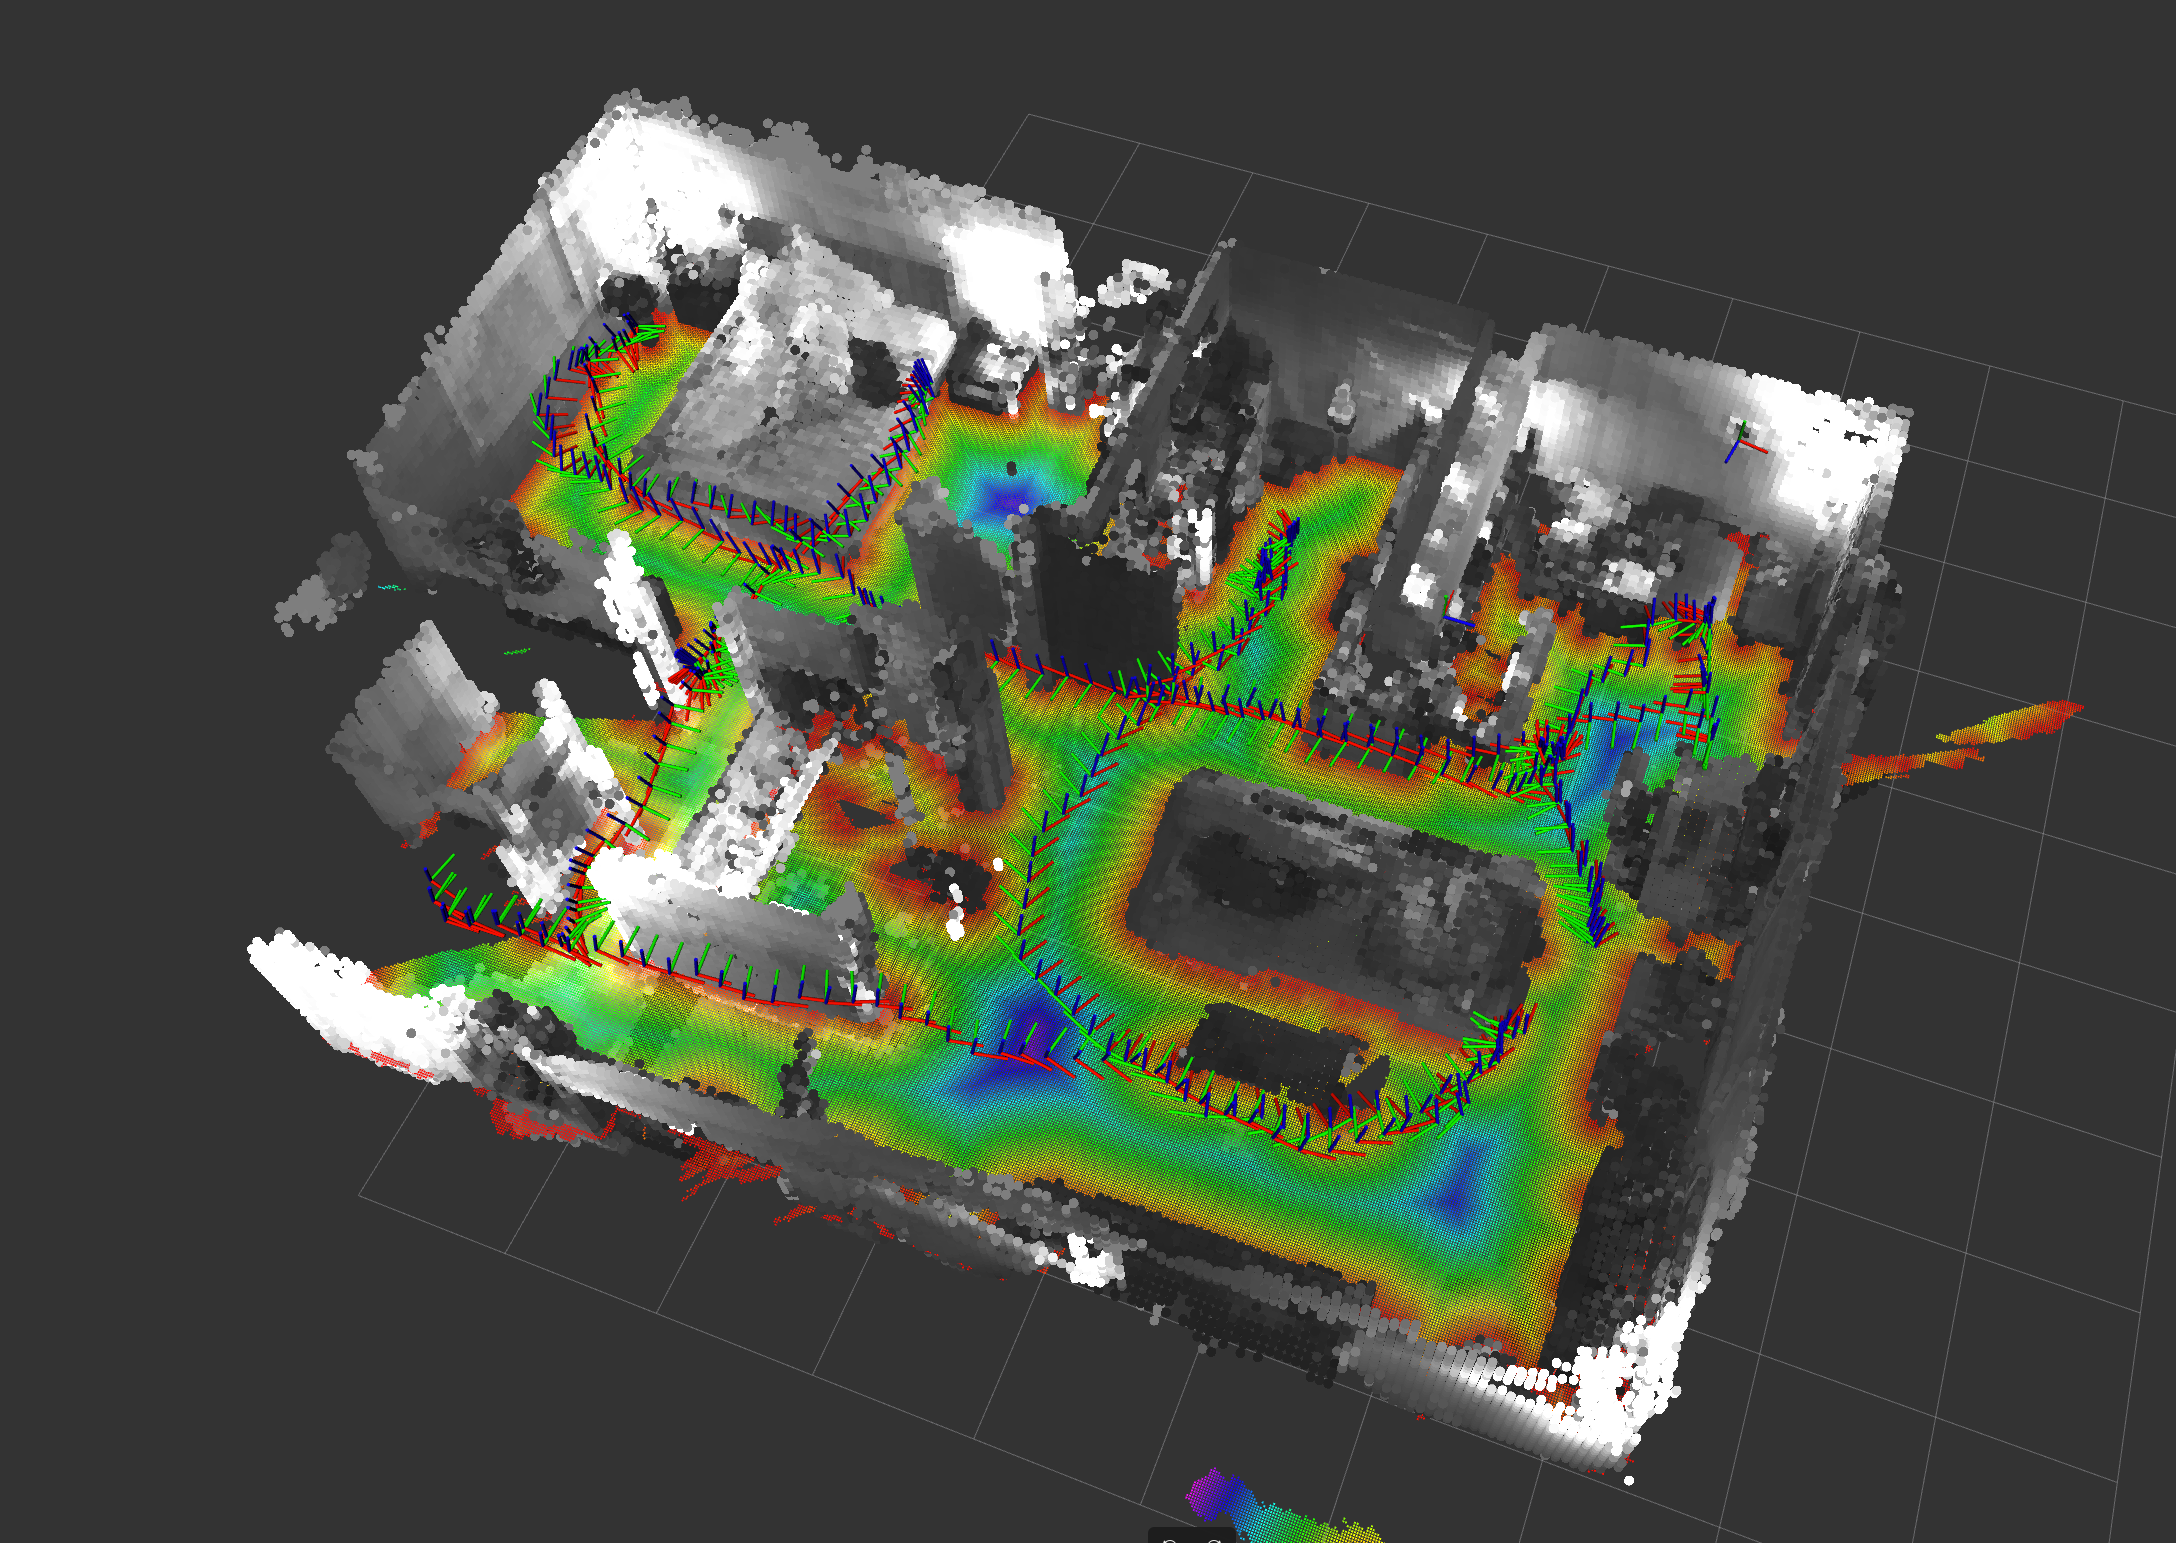
The frontend is the boundary where raw sensor data enters the system. The stereo images and IMU are processed and compressed into keyframes. Basically, when stereo pairs are ingested, features are tracked temporally (t-1/t) and spatially (left/right) and gated with backward passes. Processing the detections enables the system to quickly drop “bad” data. PnP is used to estimate relative motion in between frames. The frontend also tracks motion since the last emitted keyframe. If that motion raises above a threshold, or there is a timeout, or tracking quality drops, a new keyframe is triggered. At this point, the IMU samples that arrived within the keyframe timeframe are preintegrated and added to the keyframe metadata.
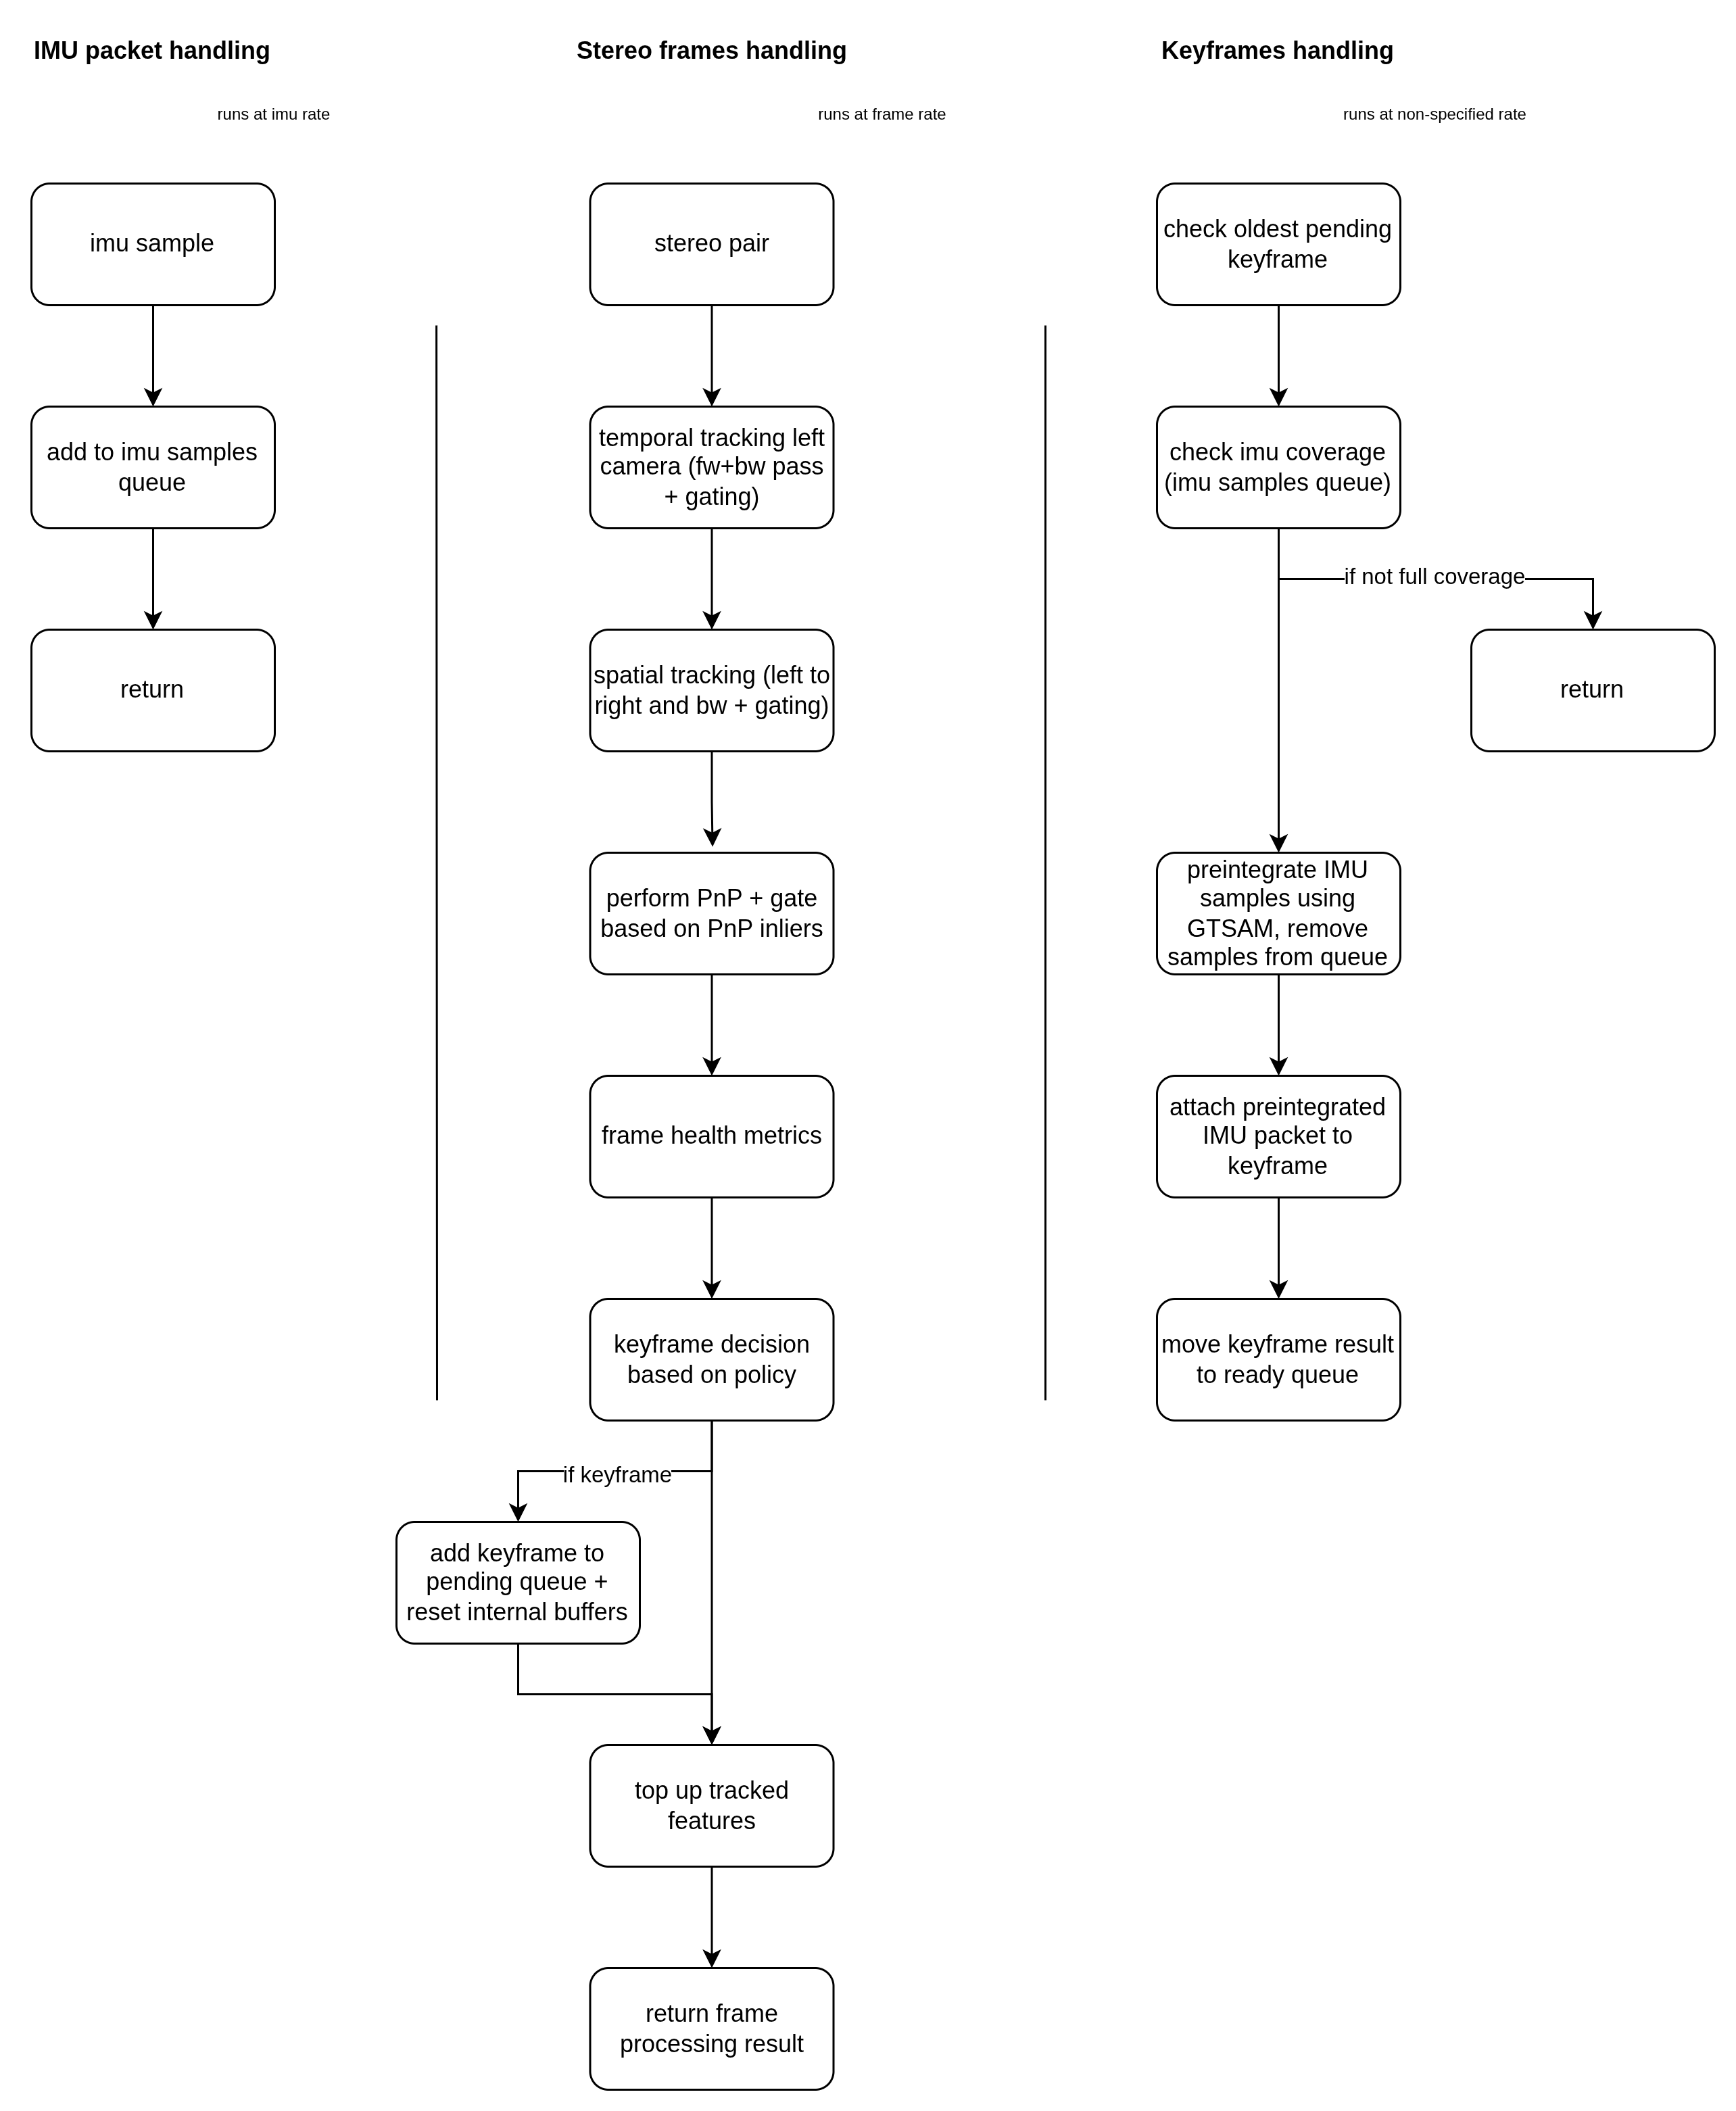
This is more clearly explained by Image 4. The frontend can be thought as 3 threads running in paralled. The IMU thread just adds stamped samples to a queue. The frames handling thread is where most of the work is done, tracking, PnP, and keyframe triggering. The keyframes handling thread should be basically run by the user of the library. This is necessary because we assume the data is not perfectly synced. If the frames thread says a keyframe should be triggered, not all the IMU samples might have been received within the interval. That keyframe is then inserted into a pending queue. The user of the module has to ask at will if a keyframe has been completed. This checks the IMU queue and if there’s IMU samples whose stamps exceed the pending keyframe interval, the IMU is preintegrated and the keyframe is then completed.
Fixed-lag backend
Running optimization from the data generated by every frame/sample would be intractable (for now). This is where keyframes come in handy. A keyframe is basically a compressed summary of what happened in a given time interval. The main input for the backend is a continuous stream of keyframes. This is the part that optimizes pose, velocity and IMU bias over a recent window.

I went with a fixed-lag setup because I wanted something that stays bounded online. It is not trying to solve the whole history at once. It only keeps a recent chunk of the trajectory and keeps re-solving that.
That is what gives the online estimate its local smoothness. But it is also why the estimate can still drift over a long run. The backend is only trying to stay locally consistent. The offline stage is what cleans up the bigger errors later.
A lot of the debugging work in this project lives between the frontend and the backend. When the estimate looks wrong, the possible causes are many: bad tracks, weak geometry, timing issues, calibration issues, or just poor visual conditions.
Tag based localization
The last piece in the online stack is localization. This part takes tag detections, filters them, and turns them into correction estimates.

Based on those correction estimates, the controller decides if the system should:
- stay in odometry-only mode
- bootstrap into localized mode
- apply tracking priors
- relocalize
This is not generic feature-map localization. It is tag based, and that is a conscious simplification. It makes the behavior easier to reason about, but it also means the system depends on seeing tags often enough. If it goes too long without seeing one, the estimate can still drift badly.
This part works, but it is still rough. Especially the transitions between plain odometry, bootstrap, and relocalization.
Last thoughts
Even with many quirks, this project already does the main thing I wanted it to do: build a map with stereo + IMU and localize in it. It also taught me that systems like this are not only about the estimator. A lot of the work is in logging, replay, visualization, debugging and all the small tools needed to understand what is going on.
Check out the improvements section in the repo for a bunch of improvements that I already identified.
Acknowledgements
- ROS2 - Probably not in enough acknowledgements. The core middleware that makes this integration easy.
- GTSAM - The core optimization package. So powerful, I’m probably under utilizing it.
- Isaac ROS Nvblox - Great open source library for mesh generation on CUDA capable hardware.
- Isaac ROS Visual SLAM / cuVSLAM - The package from which I took inspiration for some architecture and functionality.